miércoles, 28 de marzo de 2012

DIA DE LA TIERRA 22 DE ABRIL PROYECTO KINDER Y PREPRI

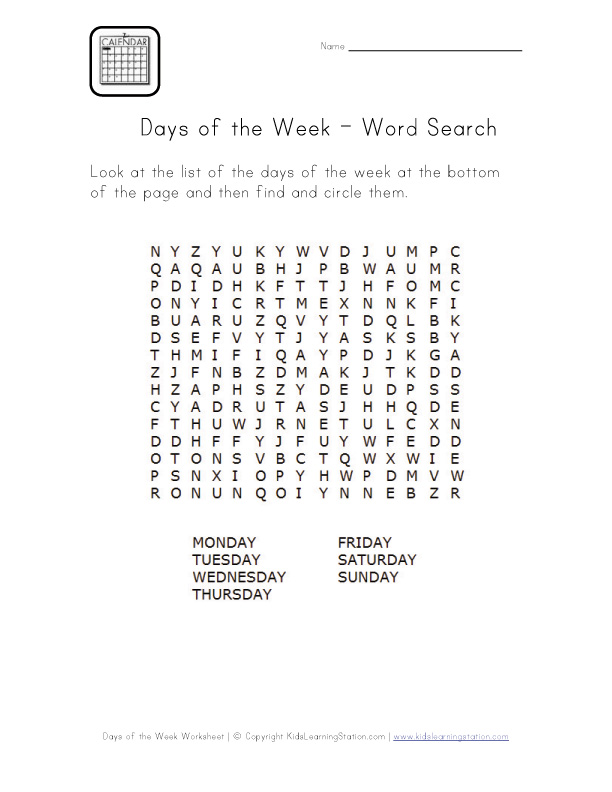
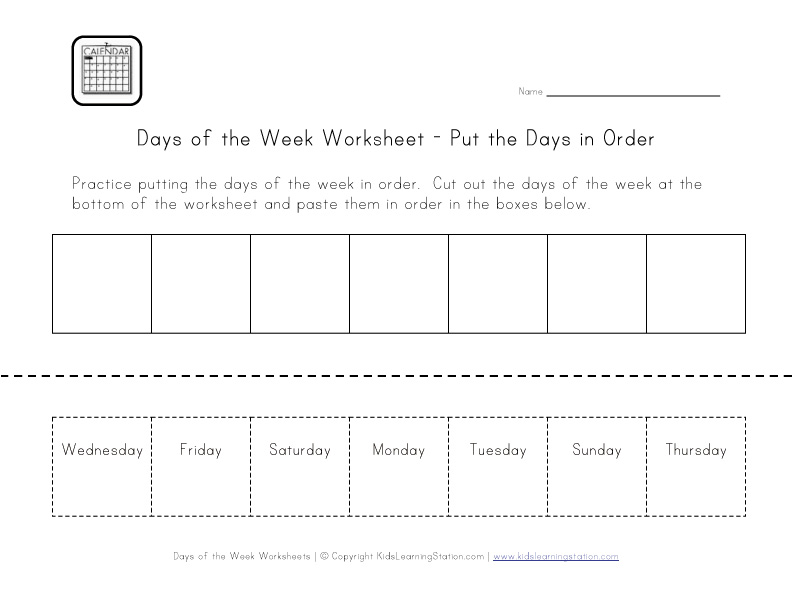
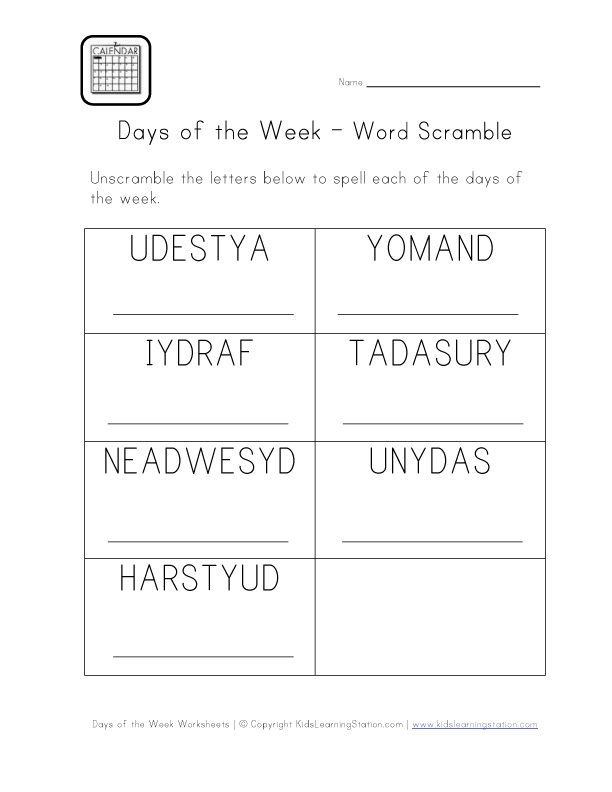
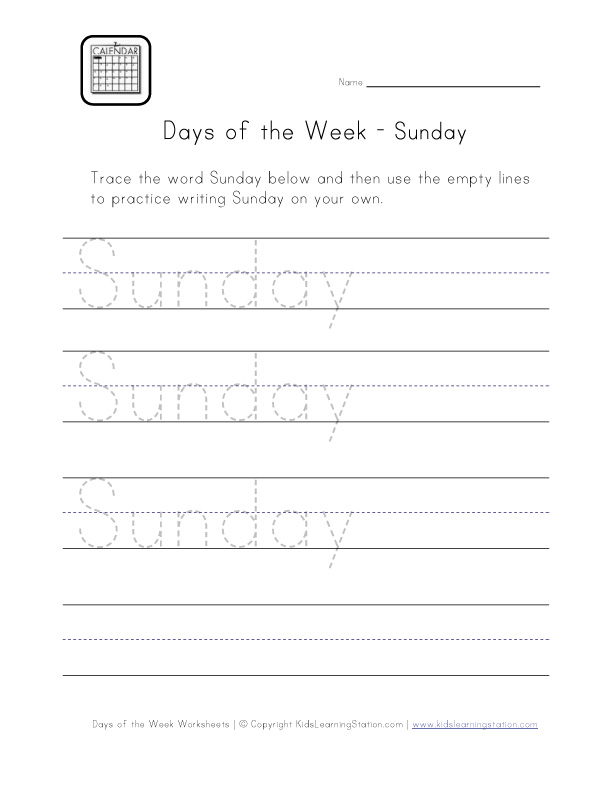
PARA LOS MÁS PEQUEÑOS 


¿Cómo pueden los niños pequeños aprender a cuidar el planeta Tierra?  

Una de las maneras es a través de las experiencias de hacer artes manuales.  Durante el proceso de hacer artes manuales los niños se familiarizan con las cualidades naturales de la tierra tal como hojas, rocas, caracoles, terreno, viento, lluvia y el sol.

Los niños también aprenden a observar, crear y a mantenerse en contacto con los cambios continuos del mundo.  Estos desarrollan un cariño y amor hacia la Tierra aprendiendo a reciclar y a usar materiales para hacer proyectos de arte y manualidades en lugar de desecharlos.

Es importante que los niños sean sensibilizados antes , durante y posteriormente de cada actividad sugerida, que vean el video y después que vayan a sus grupos a realizar las actividades.Disfruten!!


KINDER 1

¿Qué es amar la vida en la tierra?

Es cuidar y mantener limpio el aire, el suelo, las aguas, y la conservación de las plantas y los animales.

a.-Collage de Reciclar, Reutilizar y Reducción.

Escribe una letra R grande un pedazo de papel grande.  Usa papel que vas desechar y únelo con cinta adhesiva para crear un cartel.   Anima al niño a trazar con pintura sobre la letra R.
Van a realizar un paisaje con objetos reciclados, por ejemplo un plato desechable puede ser el sol y sus rayos los podemos hacer con tiras plateadas de las bolsas de papitas. Las nubes pueden ser hojas de papel recicladas. etc, etc.
 Corta pedazos de periódico, papel de páginas de revistas viejas, y cualquier otro papel desechable.  Dibujen arboles, edificios, casas, flores y el mar en el cartel.  Peguen los pedazos de papel desechable y a rellenar los dibujos con material reciclado.  Mientras el niño está haciendo el collage, discuta como ellos está reutilizando los materiales para hacer un arte - el collage.


 Si desean pueden añadir otros materiales naturales al collage, hojas secas, etc.


B.- Vamos a colorear!!


KINDER 2

A.-Vamos a elaborar unas bolsas para basura muy lindas y se las vamos a regalar a nuestros padres para que las lleven en su auto, de esta manera evitaremos la basura que muchos automovilistas avientan en la calle.

B.- A colorear se ha dicho...

te mando este bonito dibujo que vas a rellenar pero con un material que nadie , nadie voltea a ver y que nada mas tiramos al piso . Con la ayuda de tu maestra vamos a recortar en tiritas las envolturas de las golosinas , dulces, papitas,de las bolsas del te, etc. que nos hemos comido en los últimos días  y las vamos a hacer rollitos, estos  son con los que rellenaremos la siguiente plantilla. 

Mira esto:


KINDER 3

Hoy en día debido al calentamiento global, hace mucho mas calor que otros años, muchas plantas terminan secando su verdor poco a poco y muriendo. Hoy vamos a elaborar una maceta inteligente por que ayuda a que no estemos regando continuamente.
Necesitas: una botella reciclada de agua de 2 litros o litro y medio, tijeras, un desarmador para hacer agujeritos en la botella, tres tiras de fieltro ,una plantita y tierra.

Aquí te pongo la traducción:

1. Haz 3 hoyos de 1 cm aproximadamente separado por 2.5 cm en cada botella.
2. Corta la botella de 2 litros por la mitad.
3. Usando la parte de arriba, agrega 3 vazos de mezcla para macetas con un puñado de abono orgánico o arena. La mezcla para macetas tiene que ser sin tierra/suelo y generalmente una mezcla de composta y arena.
4. Corta 2 pedazos (10 cm largo x 2.5 cm ancho) de tejido que absorbe como fieltro  y agregalo adentro de el cuello de la botella.
5. Agrega agua al base de la botella.
6. Planta semilla(s) o una pequeña plantita y hecha un poco de agua encima solo una vez para que las semillas quedan en su lugar.
El tejido lleva el agua hasta la planta.


PREPRI

A.-Con una caja de huevo que reciclemos de casa, un pedazo de tela y mucha imaginación podremos hacer algo bellísimo para celebrar a la tierra, haremos un lindo ramo de flores.


jueves, 22 de marzo de 2012

UN BOSQUE EN CLASE , PROYECTO PARA PREPRIMARIA

UN BOSQUE EN CLASE PREPRIMARIA

Un bosque en la clase

  • Cuidado
  • Responsabilidad
  • Colaboración
¿Alguno de USTEDES ha visto o ha estado alguna vez en un bosque? ¿Qué había?
Seguro que todos saben que en ellos hay muchas plantas y si miramos bien podemos ver que hay plantas diferentes y animales de distintas especies.
En muchas partes del mundo, tanto en los países fríos como cálidos, existen bosques frondosos y las personas que viven cercanos a él, seguro que pueden contarnos historias fantásticas sobre ellos. Los bosques son muy bonitos y útiles, en ellos hay muchas especies de plantas y animales.

En los bosques hay muchas cosas valiosas: frutos deliciosos, plantas para hacer medicamentos, incluso goma para hacer chicles, además los bosques nos proporcionan parte del oxígeno que respiramos y madera para hacer muebles, monumentos, casas y papel.

Hoy vamos a hacer un pequeño bosque en una bandeja. Observaremos cómo con el tiempo crecen muchas hierbecitas y la bandeja parece un pequeño bosque.
ACTIVIDAD

Los niños formarán pequeños grupos de 5 ó 6 niños y el profesor les proporcionará una bandeja de plástico, papel absorbente (puede utilizarse papel de cocina) y verduras de raíz (zanahoria, nabos, remolacha, jicama, betabel, rábanos …).
Cada grupo preparará una bandeja:
  1. Colocar 2 ó 3 hojas de papel absorbente en el interior de la bandeja.
  2. Con la ayuda del profesor, cortar y quitar a las verduras la parte inferior.
  3. Poner las verduras por la parte cortada sobre el papel en la bandeja.
  4. Empapar el papel con agua.
  5. Situar la bandeja en un lugar que reciba calor y mucha luz.
Cada día un niño del grupo se encargará del cuidado de la bandeja, procurando que el papel siempre esté mojado.
Con paciencia, cuidado, agua y luz, comprobaremos que a las verduras le van creciendo las hojas y la bandeja se transformará en nuestro pequeño bosque, llena de plantas diferentes.

La piña viajera del mundo.... Proyecto para Kinder y Prepri

Hola!!! Te quiero platicar una cosa fabulosa que descubrí esta mañana:

 UNA PIÑA CRECIENDO EN MI PATIO


Realmente no lo podía creer ya que nunca había visto que pequeñitas empiezan .
He empezado a investigar y ya se algunas cosas.


El nombre científico de la piña es Ananas Comosus y es una  fruta tropical de la familia Bromelia.


Fijate entonces la piña se llama en realidad  ANANAS , COMOSUS BROMELIA, vaya nombre no?


¿Nunca te has preguntado porqué se llama piña?                                                      Su nombre proviene del parecido que tiene con un cono de pino. 


La Piña es una fruta tropical originaria de Brasil. Allí la encontraron los españoles durante la conquista de América. Los indígenas la llamaban Ananas, que significa “fruta excelente”. Todos los países la llaman así excepto en España.

La piña  necesita de un clima tropical para crecer en su estado óptimo y además debe madurar en el árbol, sino está ácida y no madura fuera.

Los principales países productores de piñas son: China EEUU, Brasil, Filipinas, Costa Rica, Tailandia, México.


La Piña es refrescante y deliciosa, dulce con un toque ácido. Mucha gente la toma después de una comida copiosa porque ayuda a dirigir


Al comprarlas, la piña debe de ser anaranjada y las hojas deben de estar tiesas y verdes. Si están marchitas y la piña blanda al apretarla, no hay que comprarla, está demasiado madura o en mal estado.
La piña debe estar madura, ya que sólo madura en el árbol y si está verde, siempre estará ácida y con menos vitaminas.


ADIVINANZAS


Tiene escamas y no es pez. Tiene corona y no es reina. ¿Qué es?


A JUGAR CON LA PIÑA Y LOS SENTIDOS


La maestra va a poner una charola con varias frutas cortadas en trocitos  entre ellos varios trozos de piña, la llevara tapada al salón  en donde los alumnos con los ojos vendados trataran de adivinar mediante el gusto que fruta es cada una.
Cada alumno tendrá dos oportunidades , al final la maestra destapara a los niños y todos trataran de describir el sabor de su fruta favorita.


A COLOREAR  CON PINTURA DE HARINA Y COLORANTES DE COMIDA

Con harina y colorantes de comida podemos crear una pasta que  servirá para pintar y hacer magníficas creaciones. Los ingredientes son muy simples y mas abajo están las plantillas  para imprimir y que los niños puedan colorear , hay tres versiones.
Ingredientes:

  • Harina
  • Jabón líquido
  • Agua
  • Colorantes de comida
  • Papel grueso
Instrucciones:
  1. Combina 2 tazas de harina, 2 cucharadas de jabón líquido y 1 taza de agua en un tazón . La idea es hacer una pasta. Puedes agregarle agua hasta que quede con la consistencia que los niños quieran. Mientras menos agua incorpores a la harina, más gruesa quedará la pasta.
  2. Separa la pasta en distintos contenedores. También puedes usar una bandeja de cupcakes o una bandeja vacía de huevos.
  3. Colorea la pasta. Unas gotas de colorante de comida teñirán la pasta de un color suave, pero si quieres colores más vivos y brillantes te recomiendo incorporar más colorante a la mezcla. Este paso es muy entretenido para los niños y con esta actividad pueden aprender los tipos de colores y cómo mezclando dos colores pueden crear un tercero. Puedes usar palitos de comida china, una cuchara o tus propias manos para mezclar los colores.
  4. Ya con la pasta lista, puedes colorear tu hoja. Asegurate de utilizar un papel grueso, ya que la pasta gruesa necesita bastante soporte y la pasta más aguada puede dañar el papel.
Mediante el arte, los niños pueden descubrir el mundo y aprender cosas nuevas. Esta es una estimulación sensorial para los niños, quienes mediante el simple juego de mezclar los colorantes de comidas y la harina con sus manos, mejoran la asimilación de la información sensorial ( en este caso, del tacto). 


Experimento   


Vamos a hacer un planta del penacho de la piña. Fijate bien.
MATERIALES
1.- Un penacho de piña con las hojas bien verdes , lisas y duras con un centímetro de pulpa
2. un vaso de plástico en donde quepa parado la parte final del penacho.
3.- una maceta de plástico 
4.- una bolsa de tierra fértil 


PROCEDIMIENTO


1.-En casa un adulto cortara la parte del penacho del penacho con un centímetro de la pulpa, mira la ilustración 
2.- En la escuela pondrás la planta en tu vaso con un poco de agua , en tres días le saldrán unas pequeñas raíces como en esta foto


3.- Ahora en la maceta pondremos un poco de tierra, un poquito de arena y tierra , con cuidado acomodamos el penacho y ponemos un poco mas de tierra apretando para que nuestra planta quede firme. 


4.- la tenemos que regar diario con poquita agua, notaras que al principio se empiezan a caer algunas hojas, pero esto es natural, al cabo de 10 días saldrán las hojas nuevas.
5.- Es hora de ponerle un moño a nuestra planta de piña para regarla a mamá.
Asi es como queda la planta

6.- Con el paso de las semanas puede ser que la planta te quiera dar hijitos , mira esto:


viernes, 9 de marzo de 2012

DAYS OF THE WEEK K2


Here you are a BOUNCHE  of activities to review the days of the week

A)
.
B)If you click on the picture below you can listen to the names of the days of the week in order. 
C)Now, if you click on this other picture you can play to put the days of the week inorder and see what happens.
D)Complete


E)Days Worksheets
All of the days worksheets below are set up to print perfectly in .pdf format. Just click on any of the images below to view and print your copy(s).days handwriting worksheetdays word search worksheetdays in order worksheetdays word scramblesunday worksheetmonday worksheettuesday worksheetwednesday worksheetthursday worksheetfriday worksheetsaturday worksheet


lunes, 5 de marzo de 2012

THE LAND OF THE FIVE SENSES K3


A WebQuest for Kindergarten
Designed by
SOFIA CHIQUETTS
capacitacionaladocencia@blogspot.com


The Five Senses Song
Tune: This Old Man

   
With my eyes, I can see
Robins nesting in a tree.

Chorus:
I see and hear, and smell, and taste, and touch.
With my senses I learn so much!

   
With my ears, I can hear
Distant noises and sounds quite near.

Chorus:
I see and hear, and smell, and taste, and touch.
With my senses I learn so much!


With my nose, I can smell
Fragrant flowers in the dell.

Chorus:
I see and hear, and smell, and taste, and touch.
With my senses I learn so much!


With my mouth, I can taste
Donuts which are chocolate glazed.

Chorus:
I see and hear, and smell, and taste, and touch.
With my senses I learn so much!


With my hands, I can feel
Bananas with a slippery peel.

Chorus:
I see and hear, and smell, and taste, and touch.
With my senses I learn so much!

*****
11 pages of posters about the 5 senses HERE


Seehearsmelltaste, and touch
our way to science learning using our five senses. 
·        How do we see pictures alike and differently?
·        How do we hear and recognize songs?
·        How do we smell and recognize scents?
·        What are our favorite foods and what do they taste like?
·        What is your favorite object to touch and what does it feel like? 


You need to investigate the five senses.
EarMouthNoseEyeHands


ACTV. ONE


Begin the PROYECT by giving each student a peanut. 


Ask the students to describe the peanut to the class. 
If they do not report on all of these observations ask:


 How does it look? 


How does it feel? 


How does it smell? 


Sound? 


The students crack open the peanut. Repeat the questions. 


LETS GO, dance!!


art and movement activity  TWO
Art and Movement Activity
      "Painting with Feet"
Preschool children often engage in finger painting.  But for this preschool activity children will use sensory motor and problem solving skills as they paint with their feet.
You will need:
Mural paper or craft paper on a roll, newspaper, tempera paint (2 compatible colors), liquid detergent, at least 4 flat pans, towels for cleanup, relaxing instrumental music, and an adult helper.
Prepare the painting area in advance by carefully taping a long sheet of mural/craft paper to the floor so that none of the edges can come loose.  Surround the mural paper with taped down newspaper.  Take the time to make sure all paper is taped down securely.  This will make a big difference when the activity is in progress.
Next, place a tub of warm soapy water at one end of the mural paper.  At the other end, place flat pans lined with thin moistened sponge cloths.  Mix tempera paint with liquid detergent and pour it on the sponge cloths.  The sponge cloths will keep the children from slipping in the paint and from getting too much paint on their feet!

.................................................................
THREE


At the SCIENCE LAB, students label each of five
 boxes with the name one sense.                             Several objects such  as an alarm clock, a telephone, peanuts, a picture of a television, a bell, a whistle, etc. are sorted by one sense used with these objects.         The categories will vary among students.              Discuss how we often use more than one sense when using objects and classifying them.
.................................................................
FOURTH

Sense of Taste
Science Activity: Tongue Tasting
During this early childhood education activity preschool children explore the 4 major tastes that the tongue can sense; bitter, sweet, sour and salty.
You will need:
Lemon wedges and lemonade, candy, potato chips and unsweetened cocoa, a pitcher and cups (for lemonade), small paper plates, small spoons, unbreakable hand-held mirrors.
Teachers should know that taste buds are grouped on the front, sides and back of the tongue.  And, that they are also in other parts of the mouth. Prepare in advance plates with samples of the foods for each child.
While talking with young children about the different foods they like encourage them to use words like sweet, sour, salty and bitter to describe the foods.  Tell them that they can taste the small samples of foods that are on their plates by putting a little on their tongues. Explain that they have "taste buds" on their tongues which help them taste and provide a few unbreakable, hand-held mirrors so they can look at their tongues.
Older children can be asked to predict how the items will taste.  For very young children use only two tastes and compare.  When preschool children frown etc. as they taste ask, "Why are you frowning?  How does the ____taste?  Is it sweet, sour, bitter or salty?"  Understand when instead of sampling, children eat the foods they like.
Finally talk about the tastes they like the best and not the best.  Provide the lemonade and while you are enjoying the refreshing drink ask what the lemonade reminds them of.
FIVE
hot or cold?

Which objects are hot, and which ones are cold? Can your child tell the difference? Have her cut and paste each image that is typically hot in the "hot" category, and then glue down the objects that are usually cold in the "cold" section. This worksheet's sure to get your child thinking about temperature critically—and scientifically!


SIX
TOUCH

With gritty sand, smooth shells, and wet water, the beach is a great place to use our sense of touch. On this worksheet, kids draw something they touch at the beach, reinforcing understanding that touch is one of our five senses and that we use our hands to touch. In addition to their imaginations, kids use fine motor skills for drawing as well as prior knowledge to complete the worksheet.


SEVEN
The Five Senses! Worksheet

OK, OK, OK, REMEMBER


Prior Knowledge

The student has
  1. described objects
  2. sorted objects
  3. counted orally to 10
  4. pointed to pictures/objects that are the same or different.

Mathematics, Science and Language Objectives

Mathematics
The student will
  1. summarize data on a graph 
  2. classify objects by shape, size and color
  3. duplicate patterns
  4. order objects by size 
  5. create and describe sets and subsets
  6. determine quantity in sets and subsets up to five and two fives as 10, etc.
  7. estimate number of objects they can see, feel in given sets.
  8. explore idea of size in relation to distance.
ScienceThe student will 
  1. name the five senses
  2. use one of the five senses to discover properties of objects in the environment
  3. name a body part used for each sense
  4. compare objects using only one sense
  5. classify objects using only one sense
  6. become aware of various physical impairments
  7. describe how the five senses work together
  8. describe ways to show proper care of eyes, ears and nose
  9. practice safety procedures relevant to the five senses
  10. describe how each sense works.
Language
The student will

  1. create a class Big Book on the five senses
  2. provide and use relevant theme vocabulary where appropriate
  3. use relations such as top, bottom, direction, space and location (above/below, front/back, near/far)
  4. listen to taped sounds and stories 
  5. match written text with illustrations of each of the five senses
  6. develop predictable language/pattern reading.

Vocabulary

taste
el sabor
sight
la vista
smell
el olfato
hearing
el oído
touch
el tacto
tongue
lengua
eyes
ojos
odor
olor
loud
fuerte
skin
cutis
salty
salado
shape
figura
nose
nariz
low
bajo
rough
áspero, a
sweet
dulce
see
ver
different
differente
high
alto,a
smooth
liso, a
bitter
amargo
color
color
soft
suave
ears
oídos
hot
caliente
sour
agrio
size
tamaño
weak
débil
sound
sonido
texture
textura
cold
frío
hard
duro, a
same
igual
strong
fuerte
feel
sentir

Concept Web

A Concept Web displays the relationship between the Five Senses and the way the body gathers information through the five senses. Sight information is received through the eyes. Hearing information is received through the ears. Touch information is received through the Hands, Feet, and Skin. Smell information is received through the nose, and Taste information is received through the mouth and tongue.


REFERENCES


Annotated Children's Books

Aliki. (1962). My five senses. New York: Harper Collins Publishers.
This book gives a good overview of the five senses and explains that sometimes we use just one or two senses, sometimes all five.Brenner, B. (1977). Caras. New York: E. P. Dutton.
Photographs show the reaction of the senses to both pleasant and unpleasant stimuli.
Broekel, R. (1988). Tus cinco sentidos. Chicago: Children's Press.
The book explores the five senses through photographs and answers questions posed by the author.
Larreula, E. (1984). El país de los cinco sentidos. Madrid: Editorial Teide, S.A.
In this fantasy world all senses are separate and only one sensation can be experienced at a time. The senses unite and become what we are today.
Murphy, C. (1986). Tus sentidos. Boston: Editorial Norma, S.A.
This pop-up book of the senses describes the location of each of the senses and how each helps us know our world.
Radlauer, R. S., & Perez, W. (1960). About four seasons and five senses. Chicago: Melmont Publishers.
This volume contains many illustrations. The text for each subsection is followed by an open-ended question.
Sands, S. (1991). Kids Discover: The five senses. New York: Kids Discover, 1(3).
This magazine issue discusses each sense separately with diagrams, photos and pictures. It also stresses the need for using all five senses in experiencing life.
Tymme, J. (1978). I like to see: A book of the five senses. Racine, WI: Western Publishing Company.